EnvoyProxy 4: Securing Connections with HTTPS
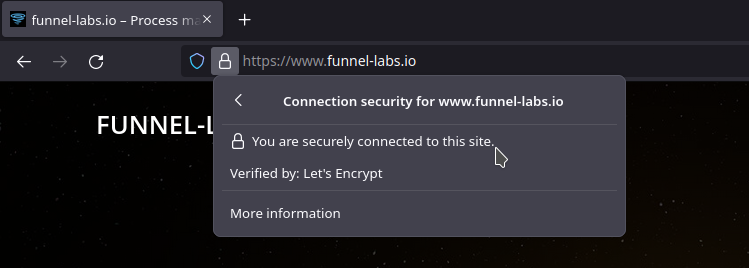
Table of Contents
Abstract
In order to secure a network system from eavesdropping and man-in-the-middle attacks, it is important to protect your data from outsiders as it travels across the public infrastructure of the Internet. Encryption can be used to shield data from prying eyes and digital signatures can verify that clients are connecting to your web service. To do this, it is demonstrated how to use X.509 certificates, that are signed by a trusted Certificate Authority, with EnvoyProxy in order to receive HTTPS connections from clients. These connections will then be routed and sent to a service inside the organization using HTTP.
Introduction
In our last article, we gave a practical Introduction to Network Security, which you should consider reading if any of the following terms are unfamiliar to you: HTTPS, TLS, X.509 Certificate, or Certificate Authority. If you are not familiar with EnvoyProxy, then please consider our gentle introduction in EnvoyProxy 1: Reverse Proxy.
Assuming that all readers have this background information under their belts, we can continue onward in our series on EnvoyProxy. In this article, we will discuss an extremely important topic, securing access to your web services. It is such an important topic, that without proper security protections, any service released can quickly be exploited and end up causing a business more harm than good in very little time. A disturbingly high number of entities are active on the Internet, searching for vulnerable businesses, and conducting attacks either for the purpose of exploitation, or merely to disrupt service access to normal customers. The psychological motivations of people who would engage in such wanton destruction and vandalism is wholly alien to most of us, but unfortunately they are sad reality that most companies must deal with.
Securing Access with HTTPS
As we discussed in Introduction to Network Security, we can protect our services from man-in-the-middle attacks and eavesdropping attacks using a series of technologies, packaged together under HTTPS, that include:
- X.509 Certificates: These certificates give us a standard-compliant way to share public keys that can be used for encrypting data or verifying digital signatures.
- Certificate Authorities: These are private organizations that are well vetted by Internet browser organizations who can validate the identify of those who create an X.509 Certificate. Certificates are normally purchased from these authorities or created by non-profit organizations like Let’s Encrypt. In this example, we will create a Self-Signed Certificate for demonstration purposes, but in your organization, you should obtain a certificate from a Certificate Authority.
- TLS: This is a protocol used by HTTPS which has the client check the validity of the certificate presented by the server, and then further communication is conducted using a session-specific symmetric encryption key. HTTPS uses this secure channel to communicate with HTTP.
So let’s get started!
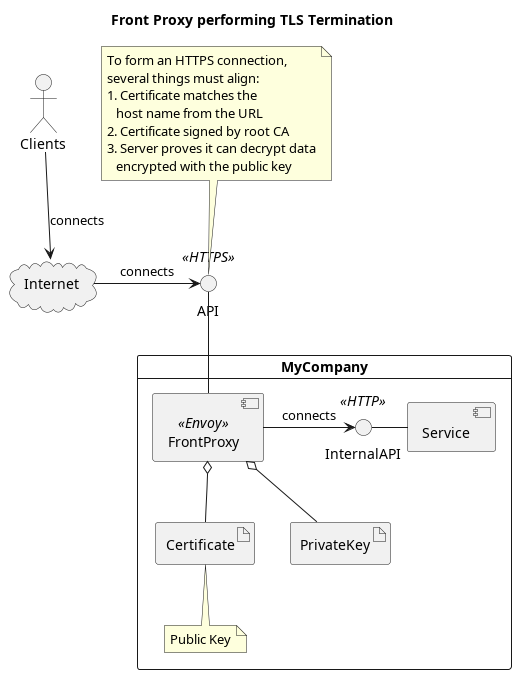
Visualize the Goal
To get us started, let’s first visualize what we will be setting up. By allowing clients to connect to our service using a trusted certificate, and encrypting the line of communication, we protect our users from eavesdropping and man-in-the-middle attacks.
Create a Self-Signed X.509 Certificate
In order to create this certificate, we’re going to make use of an open source implementation of this protocol, using a tool called openssl. Despite the tool’s name, it has utilities for both the older SSL and the more modern TLS protocols. Linux users can simply install this software (if it is not installed already) using a standard package manager like apt. In other operating systems, the tool can be downloaded and installed via the openssl website.
Openssl contains groupings of tools, and we will make use of openssl-req, which is used for certificate requests and certificate generation.
We can create an X.509 certificate, for use with TLS, with the following command:
$ openssl req -x509 -newkey rsa:4096 -keyout key.pem -out cert.pem \ -days 365 -nodes
The command options do the following:
- -x509 : Generate an X.509 certificate, the standard used in TLS, instead of a request for a certificate.
- -newkey rsa:4096 : Create a new certificate that uses the RSA asymmetric encryption algorithm, with a key size of 4096 bits (the more bits, the harder to attack).
- -keyout key.pem : The file to write the private key to. This file must always be kept secret from everyone but the owner of the certificate.
- -out cert.pem : This is the file that the X.509 certificate should be written to, which contains the public key. Clients that connect to your service will get access to this public certificate while establishing a TLS connection.
- -days 365 : The number of days for which this certificate should be valid (defaults to 30).
- -nodes : Do not encrypt the private key with a password.
We should receive a number of prompts which we can use to add description information to our certificate.
Generating a RSA private key
............................................................................................................................................................++++
..............++++
writing new private key to 'key.pem'
-----
You are about to be asked to enter information that will be incorporated
into your certificate request.
What you are about to enter is what is called a Distinguished Name or a DN.
There are quite a few fields but you can leave some blank
For some fields there will be a default value,
If you enter '.', the field will be left blank.
-----
Country Name (2 letter code) [AU]: DE
State or Province Name (full name) [Some-State]: Berlin
Locality Name (eg, city) []: Berlin
Organization Name (eg, company) [Internet Widgits Pty Ltd]: Funnel-Labs.io
Organizational Unit Name (eg, section) []:
Common Name (e.g. server FQDN or YOUR name) []: localhost
Email Address []: vijay.nayar@funnel-labs.io
Code language: PHP (php)
In this case, we used “localhost” as our domain name, which means that the certificate is only valid when used locally. If your organization certificate is for “widgets.com”, then it will only be treated as valid when a client connects to it using that name “widgets.com”. This means that if you have a staging environment, you will need different certificates there and in production.
We now have two files: key.pem and cert.pem.
Let us use the openssl tool again to inspect the contents of our public X.509 certificate:
$ openssl x509 -in cert.pem -noout -text

Certificate:
    Data:
        Version: 3 (0x2)
        Serial Number:
            1f:88:2d:f4:d8:b8:6f:6b:de:cc:1e:9d:71:fe:d9:31:71:16:23:06
        Signature Algorithm: sha256WithRSAEncryption
        Issuer: C = DE, ST = Berlin, L = Berlin, O = Funnel-Labs.io, CN = localhost, emailAddress = vijay.nayar@funnel-labs.io
        Validity
            Not Before: Oct 18 15:56:20 2022 GMT
            Not After : Oct 18 15:56:20 2023 GMT
        Subject: C = DE, ST = Berlin, L = Berlin, O = Funnel-Labs.io, CN = localhost, emailAddress = vijay.nayar@funnel-labs.io
        Subject Public Key Info:
            Public Key Algorithm: rsaEncryption
                RSA Public-Key: (4096 bit)
                Modulus:
                ...Code language: PHP (php)
Looks good, no real surprises. We have our self-signed certificate which we can browse to locally, which allows us to continue configuring the receiving side of a TLS encrypted tunnel.
Configuring Envoy to Receive HTTPS Connections
Like the previous articles about Envoy, we’ll begin with our classic simple configuration found in envoy-basic.yaml. This simple configuration listens for HTTP connections on port 8080, has no complicated filters installed, and all requests are forwarded to https://www.envoyproxy.io.
To create envoy-https.yaml, we’ll make the following changes to our configuration.
static_resources:
listeners:
- address:
socket_address:
address: 0.0.0.0
# Port 443 is the default port for HTTPS, we use 8443 in user space.
port_value: 8443
# Filter chains wrap several related configurations, e.g. match criteria, TLS context, filters, etc.
# https://www.envoyproxy.io/docs/envoy/latest/api-v3/config/listener/v3/listener_components.proto#envoy-v3-api-msg-config-listener-v3-filterchain
filter_chains:
-
# Configures a transport socket protocol like TLS or ALTS.
# To specify a specific type, a "typed_config" field with valid "@type" name is required.
# https://www.envoyproxy.io/docs/envoy/latest/api-v3/config/core/v3/base.proto#envoy-v3-api-msg-config-core-v3-transportsocket
transport_socket:
name: envoy.transport_sockets.tls
typed_config:
# A transport socket listening to downstream connections (clients) using TLS.
# https://www.envoyproxy.io/docs/envoy/latest/api-v3/extensions/transport_sockets/tls/v3/tls.proto#envoy-v3-api-msg-extensions-transport-sockets-tls-v3-downstreamtlscontext
"@type": type.googleapis.com/envoy.extensions.transport_sockets.tls.v3.DownstreamTlsContext
# TLS contextual information shared by both the client and server.
# https://www.envoyproxy.io/docs/envoy/latest/api-v3/extensions/transport_sockets/tls/v3/tls.proto#envoy-v3-api-msg-extensions-transport-sockets-tls-v3-commontlscontext
common_tls_context:
# A list of TLS certificates that can be used, clients will only choose a single one per session.
# https://www.envoyproxy.io/docs/envoy/latest/api-v3/extensions/transport_sockets/tls/v3/common.proto#envoy-v3-api-msg-extensions-transport-sockets-tls-v3-tlscertificate
tls_certificates:
-
# A datasource from which to read the public key certificate, such as a file or
# environment variable.
# https://www.envoyproxy.io/docs/envoy/latest/api-v3/config/core/v3/base.proto#envoy-v3-api-msg-config-core-v3-datasource
certificate_chain:
filename: cert.pem
# A datasource from which to read the private key, such as a file or environment variable.
# https://www.envoyproxy.io/docs/envoy/latest/api-v3/config/core/v3/base.proto#envoy-v3-api-msg-conf
private_key:
filename: key.pem
# An ordered list of filters to apply to connections.
# https://www.envoyproxy.io/docs/envoy/latest/api-v3/config/listener/v3/listener_components.proto#envoy-v3-api-msg-config-listener-v3-filter
filters:
- name: envoy.filters.network.http_connection_manager
...
clusters:
- name: service_envoyproxy_io
...
Code language: PHP (php)As you can see, the configuration has a bunch of extra nested layers that give you a variety of options in case they ever come up. When going through the configuration links, you may notice a few things:
- You can use other transport socket protocols other than TLS, e.g. you can use Google’s ALTS if you want.
- You can list several sets of certificates if you want, which allows clients to pick one based on the the encryption algorithms that they support.
- When you provide certificates, one option is to use a file, but other options exist as well, such as using inline values or reading a value from an environment variable (this is particularly useful when deploying to a cloud provider like AWS).
- Envoy configurations in YAML format are difficult to read! (But you knew that already, haha.)
Demonstration of HTTPS Connections
Now that we have a configuration that enables HTTPS, let’s start our server in the same directory where we created our public key certificate in cert.pem and our private key in key.pem.
$ envoy -c envoy-https.yaml
Let us first try to make a request on the command-line as a simple test:
$ curl https://localhost:8443

curl: (60) SSL certificate problem: self signed certificate
More details here: https://curl.haxx.se/docs/sslcerts.html

curl failed to verify the legitimacy of the server and therefore could not
establish a secure connection to it. To learn more about this situation and
how to fix it, please visit the web page mentioned above.Code language: JavaScript (javascript)
Do you remember when we talked about web browsers and other programs having a built-in list of approved root certificate authorities? Well, we signed this certificate on our own computer, and it’s not on that list. To allow the request to continue, we need to use the --insecure option.
$ curl --insecure https://localhost:8443
<!DOCTYPE html>
<html lang="en">
  <head>
  ...Code language: HTML, XML (xml)
If you use a certificate that you received from a root certificate authority, like Let’s Encrypt, then this error will not appear.
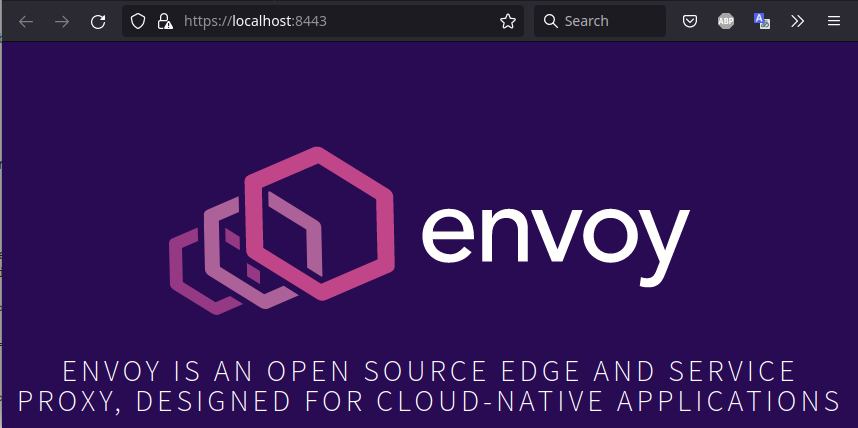
If you browse to this URL via a browser, you will need to follow a similar process. The following images come from Firefox.
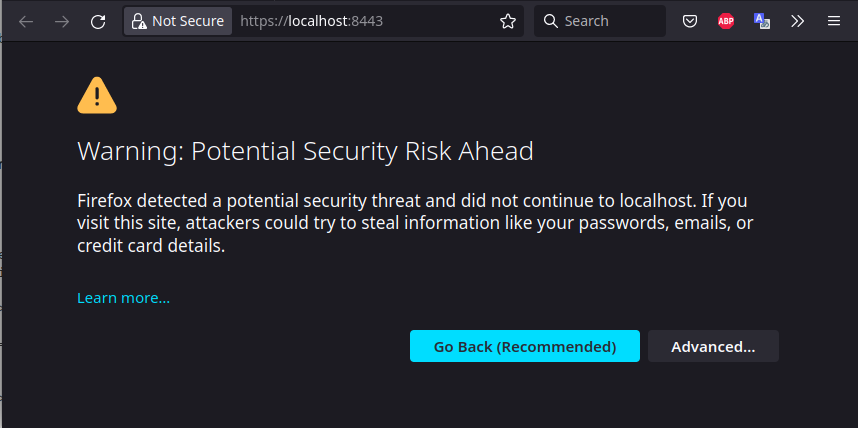
Again, our self-signed certificate is not compiled into Firefox and is not trusted by default. To allow it, we must first go to the “Advanced…” options.
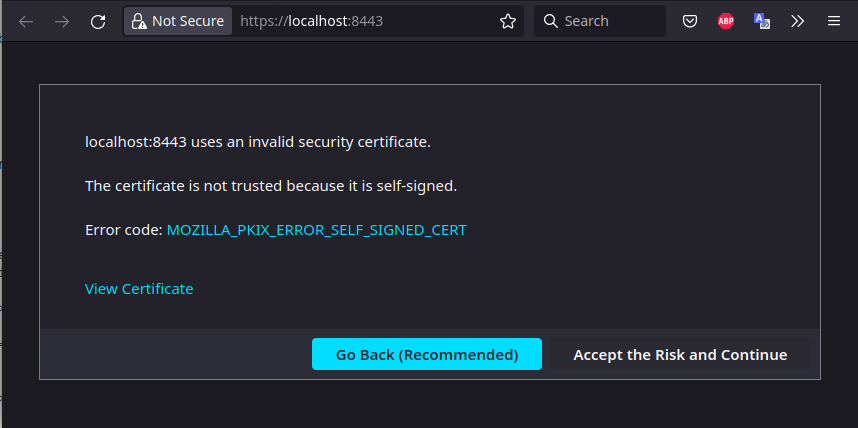
We must choose “Accept the Risk and Continue” to move forward. I hope you can live with yourself and your filthy insecure sins 😉
Once we do this, we have a working site that allows us to communicate via a TLS secured channel, and issue HTTP requests that get forwarded to the www.envoyproxy.io website.
Closing Remarks
In this article we put together some of the lessons that we had learned earlier, namely how to create an X.509 certificate, which contains a public key, as well as a private key, to be used by our front proxy. The Front Proxy (Envoy), takes care of implementing the TLS protocol and establishing an HTTP channel of communication from downstream clients to upstream services of the business. This means that the services themselves no longer have to worry about handling HTTPS themselves, and the number of services that must obtain access to the private key of the organization’s certificate is minimized (which further reduces the chances of it ever falling into the wrong hands).
While we were able to discuss in this article methods to create an encrypted channel for clients to access your web services, we have not yet covered all the topics that were outlined in Introduction to Network Security. A secure communication channel that is protected from eavesdropping and man-in-the-middle attacks is still vulnerable to users simply lying, and either pretending to be a valid user or trying to access data from other users or services that they do not have authorization to access. This will be the topic of our next article.